Posted on October 18, 2008 in Knitting & Crafting
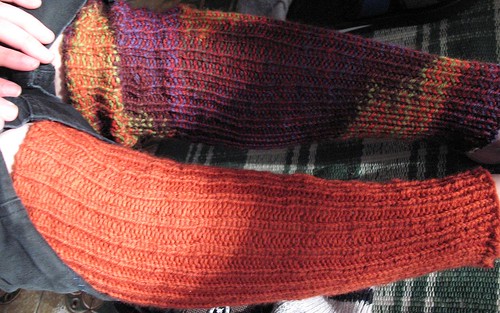
My friend wanted some legwarmers, and these are simple, but still appealing. It’s just k1p1 all the way through. She is very tiny and I only cast on 40 sts, but I could have CO 42 for her. She chose the colours. I knit these two at a time on one circular. I learned that technique for the Tangled Yoke Cardigan (which is on hold indefinitely), and it is pretty neat. The book says this is a four hour project, but it really is not. Though, still quick and mindless, good for gift giving.
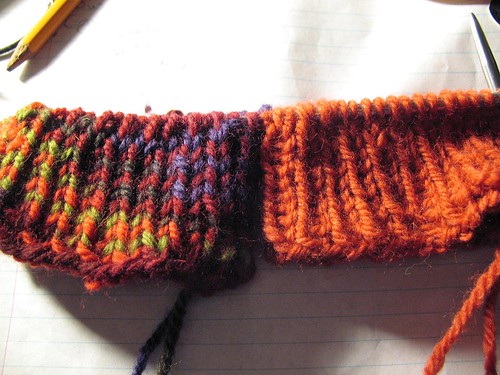
Sandy’s Legwarmers, started September 20th, 2008 finished September 27th, 2008 
Pattern: Super-Easy Legwarmers by Joelle Hoverson in Last Minute Knitted Gifts
Made for: Sandy
Size: Small
Yarn: Patons Classic Wool Merino (100g/223 yards) in Paprika and Harvest – less than one skein each
Needles: #7/4.5mm 40″ circs
Modifications: No yarn doubling, cast on 40.
Cost of Project: $14 for yarn
Would I knit it again? Maybe, but yarn doubled with mohair as intended.
Posted on September 5, 2008 in Knitting & Crafting
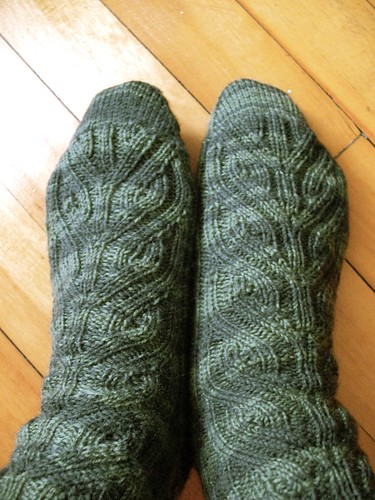
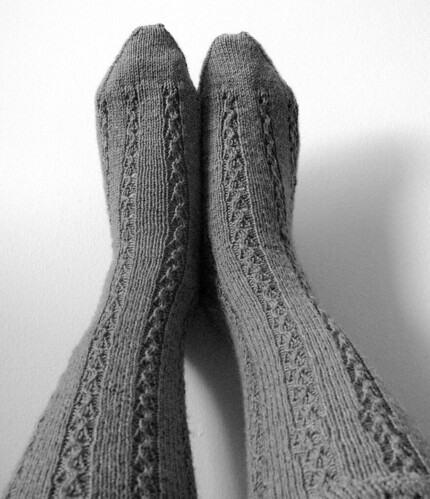
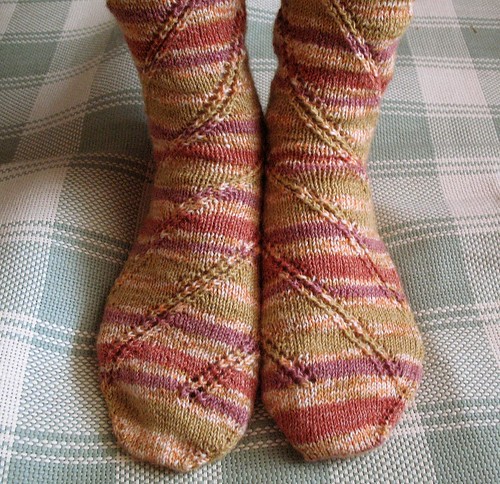
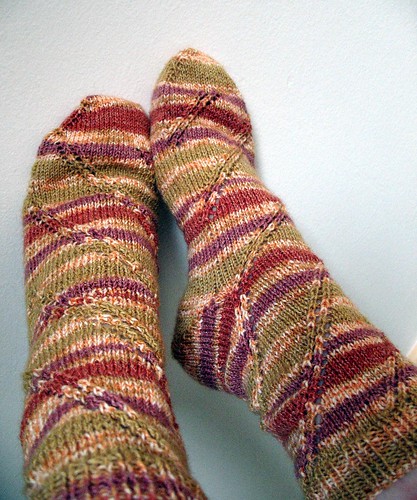
As much as I like toe-up sock patterns, this pattern bored me quite early on. The pattern is well written and charted though especially since it is designed for people for small and wide feet making it versatile. Sadly, I think it was the chart that made me indifferent. The foot is fine since half the sock is stockinette, but the leg takes forever as you do the chart on the front and back. Maybe it was all those purls and m1s; it did not make for mindless knitting. I just grew really bored with it, and rushed to finish the socks so I could move on to something else. Both the socks have a shorter leg than the pattern or I would like. For my size 7 feet, I did four chart reps on the leg, and four more on the leg.
I did a lot of my usual mods. I love the Judy Magic CO, learned a new method to do increases for the toe, and I used a different BO than the recommended k2p2 grafting (see below). Once again, I used misocrafty’s short row heel tutorial which claims hole less heels, but for some really strange reason, I always got holes on one side of the heel and not the other. Namely the side where you pick up wraps from the RS side. The other side of the heel is perfect. I experimented with picking the wraps in front, in purl, in the back, etc., but it still looked sloppy and holey. Next time, I am going to pick up the wraps on that side of the heel the “normal” way for a short row heel or learn another heel altogether.
Vinland, started August 17th 2008, finished September 3rd, 2008
Pattern: Vinland by Becca Compton in The AntiCraft
Size: 8.5″ foot circumference
Yarn: Regia Loop Color (75% New Wool/25% Nylon – 100g – 460 yards ) #5763 – 1 ball
Needles: #1/2.25mm 100cm/40″ circulars magic looping
Modifications: Judy Magic Cast On, misocrafty short row toe, and the following BO from Grumperina: “Work 2 sts in pattern (either knit or purl). Move yarn to back (if the last worked st was a knit, this is already the case). * Transfer the 2 worked sts to the LH needle, and k2togTBL. Work 1 st in pattern (move yarn to back if it was a purl), * repeat between *.”
Cost of Project: Yarn was on sale for less than $10/ball, but can’t remember exact price
Would I knit it again? If I did, I wouldn’t do the chart on the back of the leg. Otherwise, it’s unlikely.
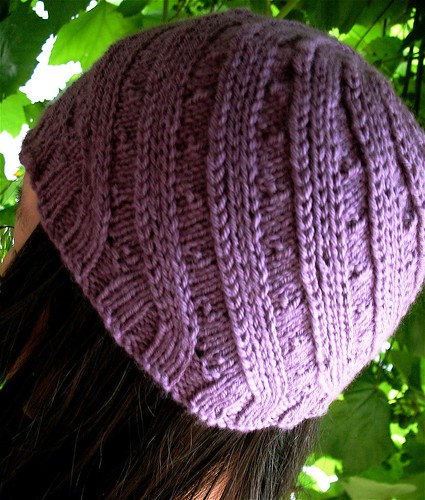
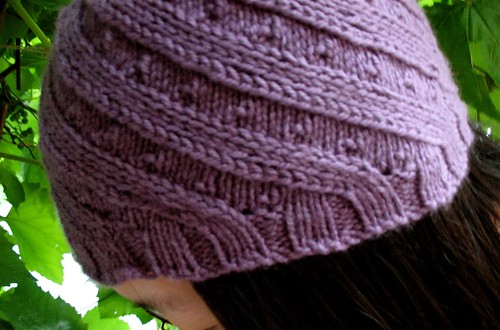
Posted on August 28, 2008 in Knitting & Crafting
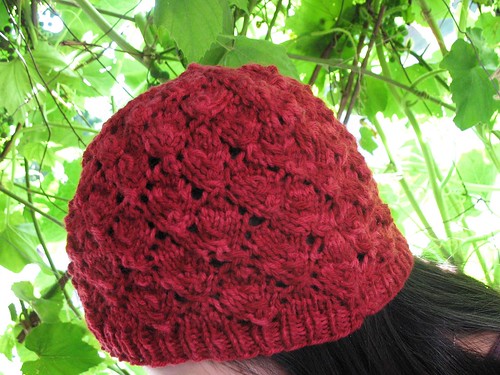
The universe may be sending me a message that I should not wear red knit hats because every time I make one, they end up too big or too small. This one ended up being way too big, and I am someone with an above average head size. I like the fact the pattern is top-down, but I really was not in the mood to make this hat and made several mistakes while doing the lace. I probably will never wear this hat. This red Cascade 220 is the one I ripped from Koolhaas (and from leftovers of Gretel) and that for some reason, I keep having bad luck with it though it’s a lovely colour and yarn. I still have one skein of it which will go into storage for who knows how long because of my upcoming move.
Foliage, started August 23rd 2008, finished August 26th, 2008
Pattern: Foliage by Emilee Mooney from Knitty Fall 2007
Size: Worsted version
Yarn: Cascade 220 (220 yards/100g) in #800 Cranberry – I had exactly 58g left (weighed at my LYS) of this.
Needles: #7/4.5mm metal long circulars with magic loop
Modifications: Emily Ocker CO and I only knit 5 rows of 1×1 rib because I was running out of yarn.
Cost of Project: $7
Would I knit it again? Doubtful. If I do, I’ll use lifelines or make the chunky version or the beret mod.
Posted on August 20, 2008 in Knitting & Crafting
I found one odd skein of Araucania Nature Wool Chunky on sale at the LYS, and instead of using it to make one project, I wanted to maximize my project possibilities by getting two neckwarmers from one skein.
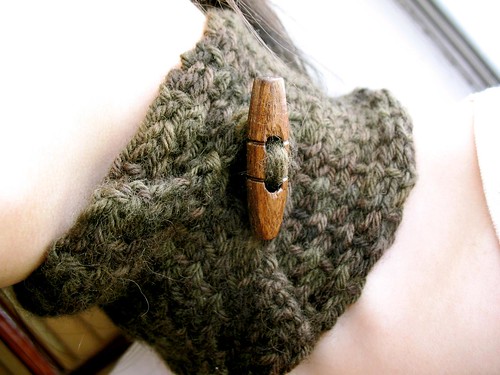
Quick, easy, and good excuse to use a cool wood toggle button. I cast on 17 sts. since my yarn less than super bulky. I knit for 22″ and then blocked it severely because it curls quite a bit.
Not So Cashmere Neckwarmer, started August 17th 2008, finished August 18th, 2008
Pattern: Cashmere Neckwarmer by Kim K.
Size: 5″ (13cm) x 25″ (64cm) blocked
Yarn: Araucania Nature Wool Chunky 100g 131 yards/120 m #115 – less than 1 skein
Needles: 7.0mm
Tools/Notions: 2″ wood toggle button
Cost of Project: $6 yarn + $2 button = $8
Would I knit it again? Yes, but I’d slip the knit stitches and/or find another to make it so it wouldn’t be that curly. I also would love to use it in the intended bulky cashmere.
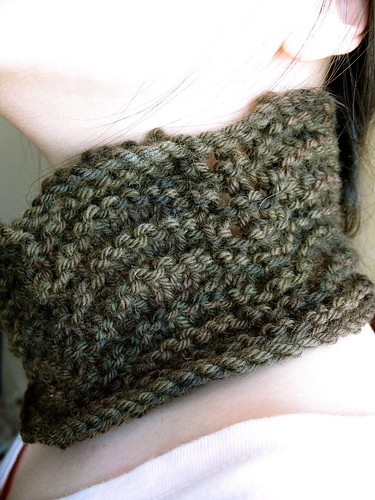
This is quite the popular neckwarmer pattern, and I can see it why. The chunky yarn makes it go by fast, and the feather and fan stitch is very attractive. Definitely a good stashbuster and gift knit. I am going to give this one to a friend.
Luxe Neckwarmer, started August 18th 2008, finished August 19th 2008
Pattern: Luxe Neck Warmer by Tracey Ullman and Mel Clark from Knit 2 Together
Made for: Nathalie
Size: 4.75″ (12 cm) height
Yarn: Araucania Nature Wool Chunky 100g 131 yards/120 m #115 – less than 1 skein
Needles: US9/5.5mm
Cost of Project: $6
Would I knit it again? Yep.
Posted on August 18, 2008 in Knitting & Crafting
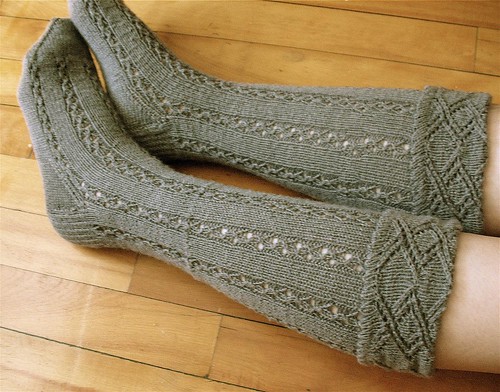
This pattern has often been paired with Regia Silk, and I would not have used the yarn in particular if it was not on sale; it is nice and soft. This is my first Nancy Bush pattern, and while it was not a perfect project, I look forward to making more of her sock patterns. These are not quite knee socks or kilt hose, more like stockings. The turn down cuff takes a lot of yarn which made me doubt how much I could spare for leg length. I also wanted to do it in 2.5mm as many have, but I only have those in DPNs, and I really like knitting socks magic loop now. I finished these for WIPwrestling of Ravelympics 2008.
Highland Schottische Kilt Hose, started July 25th 2008, finished August 17, 2008
Pattern: Highland Schottische Kilt Hose from Folk Socks by Nancy Bush
Yarn: Regia Silk 4-ply / 4 fädig Solid in #091 (50% Wool, 25% Nylon, 20% Silk) 50g – 3 skeins
Needles: My faithful Hiya Hiya #US1/2.25mm 100cm/40″ metal circulars
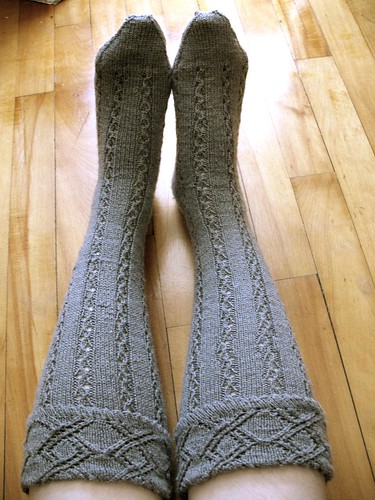
I am a little more than 5’4″, and my calves are not the most slim so I was worried about it slipping especially since I knit it on such small needles than originally called for. They do slip a bit, but not too much since I think the elastic threading I knit into the 2″ ribbing really helps. I knit the leg for 11″ (mostly because I was afraid of running out of yarn, the leg itself took nearly one 50g ball). It was all for naught though since I could have easily knit 1 or 2 inches more of the leg; the first (right) sock weighed in at 62g. I knit the foot 2″ before toe instead of 2 1/2″ called for due to fingering weight change.
Modifications: Yarn weight and needle change (pattern intended for a man), elastic threading in ribbing, 2″ before toe on foot, and magic loop as usual for me.
Tools/Notions: Elastic threading
Lessons Learned: Picot edging, and I finally did Russian Join correctly. I had tried learning it before, but this was the first actual successful time.
Cost of Project: $18 for yarn
Would I knit it again? Even though I do not seem to love the calf decreases as much as other people seem to, I would definitely like to knit this again. I’d knit the leg 12″ to 14″ next time and use 2.5mm, and keep the mods I had this time.
Helpful Links:
- Picot Edge tutorial
- Russian join tutorial
Posted on July 22, 2008 in Knitting & Crafting
What a lovely hat pattern. I tried to find some beads for this more than once, but I did not have much luck so I just decided to do it beadless and took a tip from another knit blogger by purling where the beads are suppose to be. It was a super quick knit which yields lovely results. I love the yarn; it is yet another oddball that I bought. The colour is great, but the yarn is wonderfully soft to knit with. I suspect it will pill quite easily over time, but that just makes me want to buy this yarn again and make another hat.
Odessa, started July 15th 2008, finished July 17th 2008
Pattern: Odessa by Grumperina from (now defunct) Magknits, February 2006
Yarn: RYC Cashsoft DK by Rowan (57% extra fine merino, 33% microfibre, 10% cashmere – 50 g/142 yards) – 1 ball
Needles: #3/3.125mm 16″ circs, #6/4.0mm 16″ circs and DPNs

Modifications: Purled where it indicated BK1
Cost of Project: $6 for yarn
Would I knit it again? Yes! Hopefully with beads next time, but I also think it’s a super easy and quick hat pattern that is very appealing.
Posted on July 16, 2008 in Knitting & Crafting
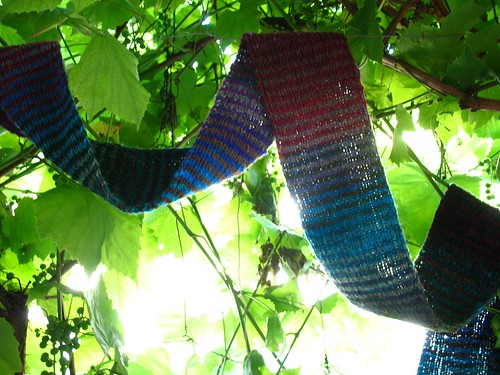
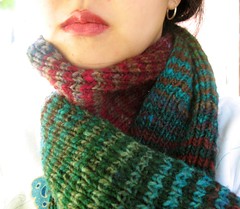
A simple yet enjoyable project with gorgeous result. My second Noro project, but my first time with Kureyon. I love this scarf; I am definitely a fan of Noro. It is yet to be blocked, and I am someone who is not bothered by really course or textured yarn. Though, I may block it eventually when it actually gets cold so it can soften up, but it is already quite long and really wide even when I restarted on a 4.0mm with 35 sts cast on.
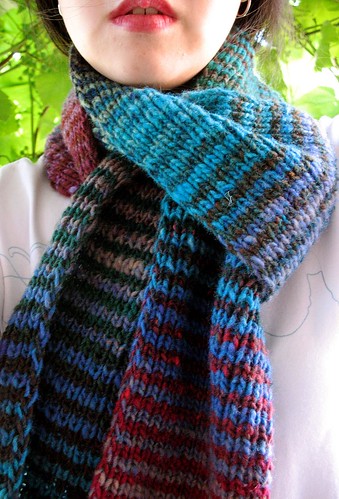
Noro Striped Scarf, started May 27th 2008, finished July 14th 2008
Pattern: Noro Striped Scarf as popularised by Jared Flood.
Size: 6″ x 76″ (6 feet 4 inches) unblocked

This was a very enjoyable knit, as I knit slowly while watching films or when on break of other more advanced projects. I really enjoy making easy and enjoyable scarves even after having learned so much. The colour variations of the yarn makes this scarf even more unique and fun than most. This will definitely be my new go-to winter scarf.

Yarn: Noro Kureyon (100% wool 50g 110yds) – 2 skeins #156, 1 skein #147, and 1 skein #159
Needles: #6/4.0mm
Cost of Project: $28 for yarn (the most expensive project that I have undertaken yet I think)
Would I knit it again? Yes! Next time, I would make it skinnier, and one could probably make one skinny scarf (casting on less than 25 sts) with two skeins of Noro.
Posted on July 14, 2008 in Knitting & Crafting
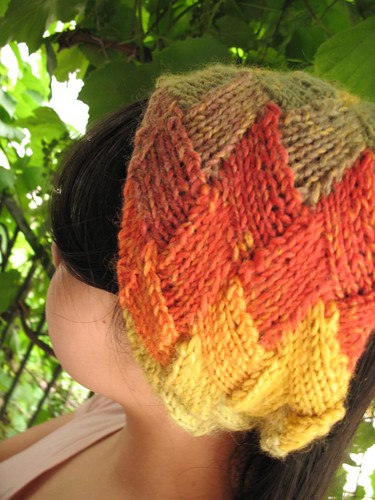
My second entrelac project after Danica. I really like the technique, but I think of the two projects I liked Danica more. I bought this odd ball yarn with the intention of making a Calorimetry with it, but I made one of those earlier in the week for a friend and the Quant entrelac was a-calling. I am unsure if I will wear it since it is flashy and not actually that warm; I have never really loved headbands. It is cute objectively speaking.
Quant, started July 10th 2008, finished July 12th 2008
Pattern: Quant by Star Athena, Knitty Winter 2007
Yarn: Wisdom Yarns Sonnet #715 (50g 93yds/85m) – 1 skein
Needles: #7/4.5mm HiyaHiya long circs
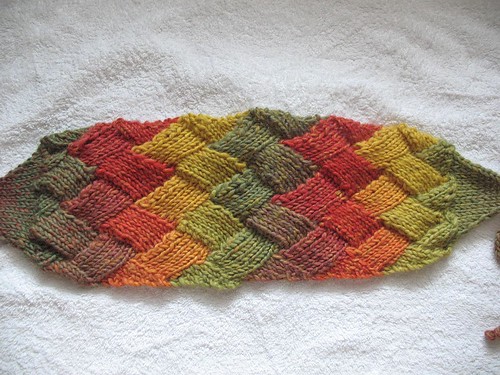
Modifications: Since I did not have enough yarn and was afraid of running out, I knit only 12″ instead of the 15″ called for and then blocked like mad. I used mightbekatrina’s mods to make it symmetrical at the end:
Ending with Section 1:
Set up: (RS) pick up 5 stitches along triangle edge (6 total), pass last one back to ssk as usual. Turn.
Row 1: (WS) p to last 2 st, p2tog
Row 2: (RS) sl1, k to last st, ssk
Repeat these 2 rows until 1 st remains.
Repeat this procedure for the other two triangle ‘holes’. 1 st will be left on the needle. Turn.
(WS) Pick up 17 more stitches along the edge: 5 in the first triangle, 6 in the other two. 18 sts total.
Row 1: (RS) k1, ssk, k to last 3 sts, k2tog, k1
Row 2: (WS) p all sts
Repeat these 2 rows until 6 sts remain.
(RS) ssk, sl1, k2tog, psso, k1 (or any other 3 st decrease you like). 3 sts .
Work in I-cord to match the other side. BO.
Cost of Project: $4 for yarn.
Would I knit it again? Yes, and maybe try using DK weight yarn.
Posted on July 4, 2008 in Knitting & Crafting

Often, I’ll see a pattern and just want to make it for no other reason than that I want to. I find I don’t even necessarily care for the end result, but I want to make it and use the pattern. This is what happened with this pattern that I saw a year ago. It is an experiment mostly to try out knitting with wire. Now that I have, I’m not too keen on doing it for awhile. It is difficult, but it was educational. I doubt I’ll wear this cuff often since it looks a bit bulky on me personally and may not exactly be my style. My cuff looks nothing like the one in the book.
Sterling and Bead Cuff, started July 1st 2008, finished July 4th 2008
Pattern: Sterling and Crystal Cuff by Annie Modesitt from Lace Style
Size: It is about 2″ of wire and 2 1/2″ with the beads tall
Yarn: Bead Smith Bead Silver Wire with Copper Core 26ga and 28 square beads
Needles: 3.75mm metal DPNs
Modifications: I did one less repeat, did not use crystal, and didn’t really follow the finishing instructions.
Tools/Notions: Marker for the round, beads
Cost of Project: $13
Would I knit it again? No.
Posted on July 2, 2008 in Knitting & Crafting
My first toe-up socks. Originally I started toe-up Jaywalkers but I ran into problems so I decided to just do those another day top-down. I like toe-up socks because you can try them on. This is a very easy pattern to knit as well. A good candidate for a first sock pattern. It’s also one of those patterns that goes well with all sock yarn. As for toe-up vs. top-down, I wouldn’t say I love one technique over the other yet, but I do love sock knitting in general. Same goes with the heels, I like the short row heel I used.
Anastasia Socks, started June 16th 2008, finished July 1st, 2008
Pattern: Anastasia Socks by MintyFresh
Yarn: DGB Confetti 100 Cotton (100g/418 yards – 35% cotton 49% wool 16% nylon – #15.04) 1 skein
Needles: US#1/2.25mm 100cm metal Hiya-Hiya circs – Magic Looping
Magic Cast Oned 28 sts so I could avoid using a short row toe. I hate provisional cast ons where I must pick up from scrap yarn. As a result, I love the Magic CO and will use it for all my toe-up socks unless another good non-provisional CO comes along. A tip for increasing from 28 to the 60 is using a YO and then knitting it through the back loop in the second knit row. I find this achieves a better increase than M1A or KFB.
Modifications: Magic Cast On and miscocrafty’s short-row heel (which involves picking up two wraps and passing them over k st)
Lessons Learned: Magic Cast On, short row heel, and EZ’ sewn BO (which I think I learned before, but don’t know for what)
Cost of Project: $12 approx.
Would I knit it again? Maybe, but not for awhile. The pattern says to knit foot until 1.5″, I think one can start it at 2″ before heel. There is some room in the foot. I could have probably knit another 0.5-1″ of leg too, but I’m always scared of running out of yarn.
Helpful Links:
Posted on June 16, 2008 in Knitting & Crafting
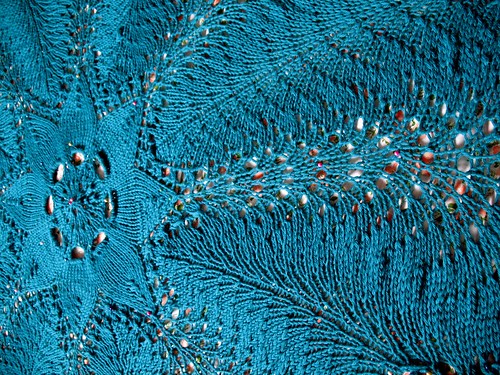
Even though I had start this twice and it gave me some trouble towards the end, this is the most beautiful thing I have made yet.
Once I frogged back my first attempt after several mistakes of not being careful, it went extremely well through the knitting. I flew through the pattern doing up to line 55 of Jared’s chart (or 101 in the Extended/normal chart). I love the colour though the Cascade 220 dye can run quite a bit in the wash.
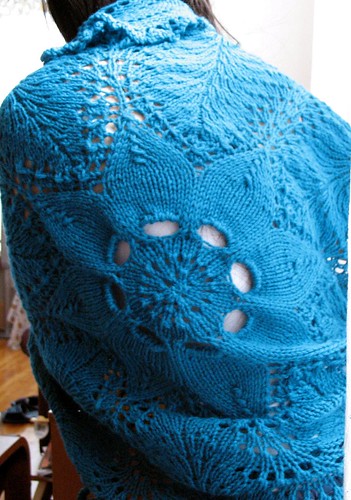
When I hit the bind off row, my troubles began as I realised that I did not have enough yarn. I had to buy more yarn, but I could not rip back to add a repeat because I had placed my life line way too far down. That discouraged me quite a bit because I thought I had enough yarn by going down a needle size and not doing the repeat. I accidentally broke the Emily Ocker cast on when I was weaving in, but I fixed it so it is not too troublesome. I did not enjoy the blocking too much, and only stretched it 9 inches.
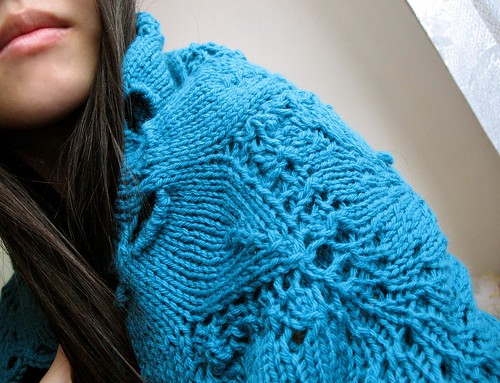
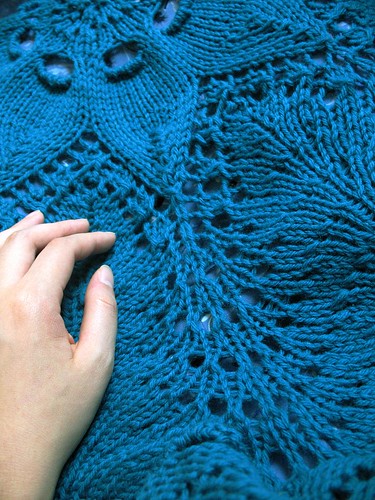
The camera does not capture the colour adequately; it is very lovely turquoise aptly named Caribbean. The edge/BO rnd was difficult to block and looks a bit unkempt, so I avoided taking photos of it. I may iron the edges lightly at some point. As usual, I blocked with a bath of Eucalan Lavender.
Hemlock Ring Blanket, started May 19th 2008, finished June 13th 2008
Pattern: Hemlock Ring Blanket adapted by Jared Flood
Size: 45″ blocked. 36″ unblocked.
Yarn: Cascade 220 Wool – #8907 Caribbean – 100g/220 yards – 3.1 skeins
Needles: US#9/5.5mm 40″/100cm bamboo circs with magic loop
Modifications: Emily Ocker Cast On, I often ssk instead of sl1k1psso, and with the BO rnd I k2tog, O, ssk.
Tools/Notions: Stitch markers, lifelines, and row counter are all necessary.
Lessons Learned: Emily Ocker Cast on.
Cost of Project: approx. $28
Would I knit it again? Yes! I would make it bigger. I would love to make this in Cascade Eco wool. It is not sold widely in Canada, but one day though.
Helpful Links and Tips: I used The Rainey Sisters‘s PDF of the pattern as it is updated with the errata and uses ssk. It uses Jared’s chart, and additionally, I paired it with the Hemlock Ring Knit Along Yahoo Group‘s Extended Chart which has helpful numbers of YOs and stitch counts (though there is a small error in the one I got). Being a member of Ravelry’s Hemlock Ring Doily Throw Knitters group also gave reassurance.
Posted on May 28, 2008 in Knitting & Crafting
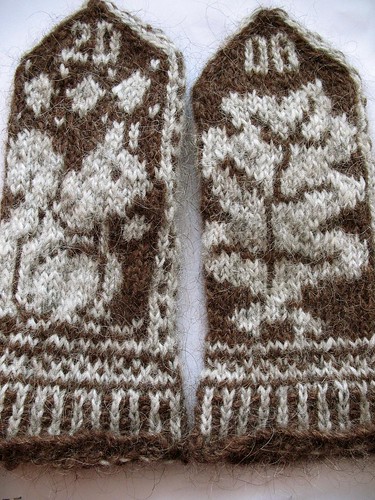
I first started this project with the recommended 3.25mm needle, but since I was using a worsted weight rather than the recommended DK, it was way too tight. I moved up to 3.75mm, but it still is tighter than most mittens. Oh well, I can wear it and they are warm due to the lopi. I do like stranded projects, and I would be willing to do these mittens again with the MC as a light colour as the pattern calls for.
Squirrel and Oak Mittens, started April 26, 2008, finished May 18, 2008
Pattern: Squirrel and Oak Mittens by Adrian Bizilia.
Yarn: Ístex Létt-Lopi (100% Icelandic Wool 50g/109 yds) – less than one skein of Ash and Chestnut
Needles: #5/3.75mm 40″/100cm circulars.
Modifications: Change in yarn weight, needles, and dark colour MC.
Cost of Project: $20 for yarn and needles
Would I knit it again? Yes, but with original DK yarn weight. Also, normal light coloured MC.